
MicroATX motherboard are a great way to conserve space in your computer. They are also a more affordable option for those on a budget. MicroATX motherboards come in both desktop and laptop configurations, and they offer a variety of features that you may not find on other types of motherboards. For example, MicroATX motherboards typically have fewer slots for memory and expansion cards, so if you need those features, you may want to consider a different type of motherboard.

How to choose the best MicroATX motherboard for your needs
MicroATX motherboards are a great choice for a small form factor build, and they come with a range of features that can make your life easier. Here’s what you need to consider when choosing the best microATX motherboard for your needs.
Size
microATX motherboards are smaller than their ATX counterparts, so make sure you have enough room in your case for one.
Features
microATX motherboards come with a range of features, so consider what you need before making your purchase. Do you need onboard graphics? USB 3.0? SATA 6Gbps?
Socket Type
microATX motherboards use the same socket type as their ATX counterparts, so make sure your CPU is compatible.
Chipset
microATX motherboards come with a variety of chipsets, so choose the one that best suits your needs.
Ports
microATX motherboards come with a variety of ports, so make sure you have the ones you need.
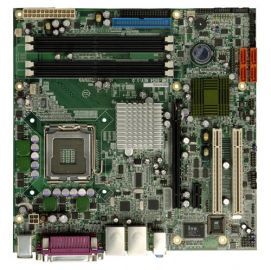
Intel IMB-9454G
The micro-ATX Motherboard with Intel Core 2 Duo and Pentium 4 IMB-9454G is a great microATX motherboard for general use. It comes with an AM4 socket and supports Intel processors. It has D FSB 533/800/1066MHz CPU, VGA, Dual PCIe GbE, SATA II, USB 2.0, and 6 COM. It also has USB 3.0 ports, SATA 6Gbps ports, and onboard audio.
The benefits of using a MicroATX motherboard in a mini itx build
microATX motherboards provide all the features of a standard ATX motherboard in a smaller, micro-sized form factor. This makes them perfect for mini-ITX builds, as they offer more connectivity and expansion options than mini-ITX motherboard. Additionally, microATX motherboards are often more affordable than their full-sized counterparts, making them a great option for budget-minded builders. For these reasons, microATX motherboards are a great choice for anyone building a mini-ITX PC.
When it comes to choosing a microATX motherboard, there are a few things you need to keep in mind. First, consider what type of CPU you want to use. AMD CPUs will require an AM4 socket, while Intel CPUs will require an LGA 1151 socket. Second, take a look at the number of USB ports and make sure there are enough to support all of your devices. Third, think about which expansion slots you need and make sure the motherboard has them. Lastly, check the reviews to see what other users have to say about the motherboard before making your final decision.
How to install a MicroATX motherboard?
microATX motherboards are available in a variety of sizes and shapes. The most common size is 9.6 inches by 9.6 inches. However, there are also microATX boards that are 12 inches by 9.6 inches and 12 inches by 10.5 inches. The larger microATX boards can be used in full-sized ATX cases, but they will not fit in smaller microATX cases.
Most microATX motherboards have four DIMM slots for memory modules. These slots support DDR3 or DDR4 memory modules with speeds up to 2133MHz. Some microATX boards also have support for ECC memory, which is designed for servers and workstations.
When installing a microATX motherboard, it is important to use the correct standoffs. Standoffs are small metal spacers that are used to hold the motherboard in place and prevent short circuits. The correct standoffs will depend on the size of your microATX board. If you are not sure which standoffs to use, consult the manual for your motherboard or case.
Once you have installed the motherboard and standoffs, it’s time to install the CPU. Most microATX motherboards use the LGA 1151 socket, which supports a variety of Intel and AMD processors. To install the CPU, simply remove the protective cover from the socket and insert the processor. Make sure that the gold contacts on the bottom of the processor are properly seated in the socket.